


Secondary sourceDocument2014 (drawn from a 1934 study)
Order of Battle of Bayezid's Army at Ankara, 1402
Moravats · 2014 (drawn from a 1934 study)
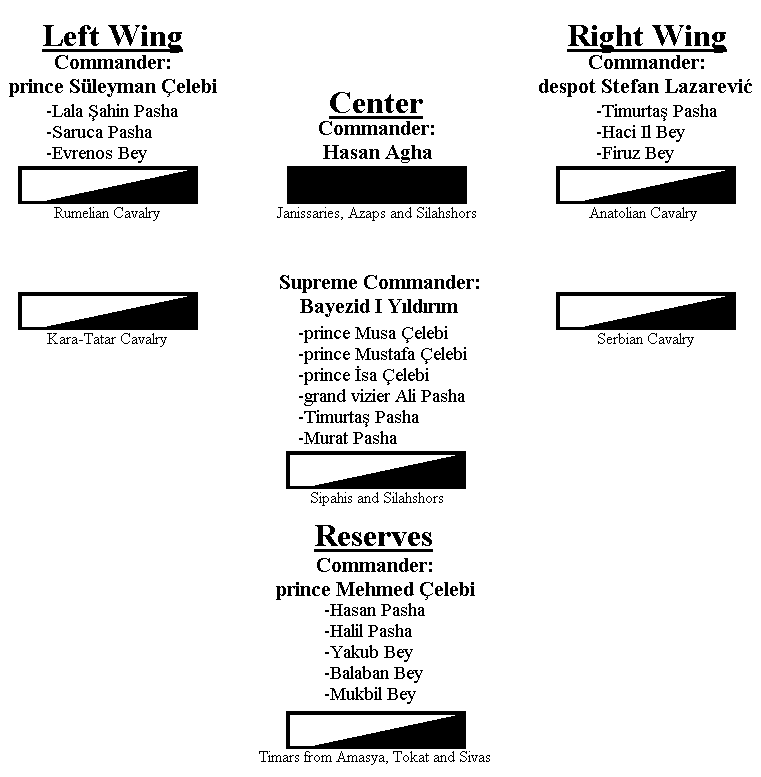
A modern military diagram of the army Bayezid led at Ankara, based on a 1934 Turkish study. It is a reconstruction, not a document from 1402.
Reconstructs the army Bayezid commanded at Ankara in 1402, the battle in which he was captured.
Free Humy account · No credit card · 120,912 sources to read
About this source
What it is
This is a diagram of the order of battle of Bayezid's army at Ankara in 1402. It lists the left wing under Prince Süleyman Çelebi, the center under Hasan Agha, the main command under Bayezid I with his princes and officers, the right wing under Despot Stefan Lazarević, and the reserves under Prince Mehmed Çelebi. The diagram was uploaded in 2014 and is drawn from the 1934 study by Ömer Halis Bıyıktay, Timur's Anatolian Campaign and the Battle of Ankara.
Why it matters
The diagram shows how Bayezid arranged his forces before the battle that ended with his capture by Timur. It is a modern reconstruction based on a historian's study, so it reflects the sources and judgments of its author rather than a record made at the time. It names many commanders, including Evrenos Bey and Stefan Lazarević, showing that the army drew on Ottoman, Serbian, and other troops. Such diagrams help students see the structure of a medieval army.
Look closer
- How is the army divided, and what does that division suggest about the commander's plan?
- Which commanders and groups appear in several places, and what might that show?
- What might a diagram made in 2014 leave out, and how could you check it against another source?
This document is part of the curated material that grounds the AI version of Bayezid I on Humy.ai — when students ask about related events, the AI can quote it and cite it.
More Bayezid I sources
Browse all 91 →
Ready when you are
Start chatting with Bayezid I now.
20 messages free · No credit card · Available in 50+ languages.